Table of Contents
1. What is Gemini?
Gemini is an internet protocol introduced in June 2019 as an alternative to HTTP(S) or Gopher. In layman's terms, it's an alternative way to browse sites (called capsules) that requires a special browser. Since Gemini is not standardized as an internet standard, normal web browsers won't be able to load a Gemini capsule. Instead, you'll need to use a Gemini-specific browser.
The content found within a Gemini page is called Gemtext and is extremely basic (on purpose). Gemini only processes the text, no media content like images. However, you're able to style 3 levels of headings, regular text, links (which will display on their own line), quotes, and an unordered list.
Here's a complete listing of valid Gemtext:
# Heading 1
## Heading 2
### Heading 3

Regular text! Lorem ipsum dolor sit amet.

=> https://example.com My Website
=> gemini://example.com My Gemini Capsule

> "If life were predictable it would cease to be life, and be without flavor." - Eleanor Roosevelt

My List:
** Item
** Item

```Anything between three backticks will be rendered as code.```
1.0.1. Free Option
There are probably numerous websites that allow you to create your personal Gemini capsule, but I'm going to focus on the two sites that I have personally tested. The first option below, Midnight Pub, allows you to create/edit any Gemini files you want in your account. This is essentially a GUI option with a built-in text box for editing. The second option below, Sourcehut, allows you to use a Git repository and automatic build process to deploy your personal Gemini capsule every time you push a commit.
1.1. Midnight Pub - Beginner Friendly
Midnight Pub is a small, virtual community meant to reflect the atmosphere of wandering into a small alley pub. The site is built in Gemtext and has a server-side process to convert Gemtext to HTML if someone loads the site in an HTTP(S) browser.
To create an account, you'll need to email the owner of the website to obtain a key. You can find their email on the Midnight Pub homepage. Once registered, head to your account and select manage site. This is the screen where you can upload or create any files to be displayed on the internet.
For example, I've created both an HTML file and a Gemini file. Remember that Gemini is automatically converted to HTML on the Pub, so you don't need an HTML version. For example, I created an HTML version to add in some extra styling.
All you need to do is create a page like index.gmi and use your Gemini
browser to head over to your-username.midnight.pub to see the result.
That's all there is to it! Easy enough, right? Let's check out a more advanced version in the next section.
2. Paid Option
As of 2021, Sourcehut has decided to require users to have a paid account in order to utilize their automated build system. For now, paid accounts can be as low as $2/month.
2.1. Sourcehut
Sourcehut is a collection of software development tools, but mostly surrounds their hosted Git repository service. Simply put, it's a minimal and more private alternative to services like GitHub.
This walkthrough is more advanced and involves things like Git, SSH, the command line. If you don't think you know enough to do this, check out my walkthrough on creating a Gemini capsule for the Midnight Pub instead.
The first thing you'll need to do is create an SSH key pair, if you
don't already have one on your system. Once created, grab the contents
of id_rsa.pub and add it to your Sourcehut account settings - this
will allow you to push and pull code changes without using a
username/password.
ssh keygen
Next up, let's create a repository with the proper name so that the Sourcehut build system will know we want them to host a website for us. Use the following format exactly:
mkdir your-username.srht.site && cd your-username.srht.site
Now that we've created the repo, let's initialize Git and add the proper remote URL.
git init
git remote add origin [email protected]:~your-username/your-username.srht.site
Now that our repository is set up and configured, we will need to create at least two files:
index.gmi.build.yml
For your .build.yml file, use the following content and be sure to
update the site line with your username!
image: alpine/latest
oauth: pages.sr.ht/PAGES:RW
environment:
    site: your-username.srht.site
tasks:
    - package: |
          cd $site
          tar -cvz . > ../site.tar.gz
    - upload: |
          acurl -f https://pages.sr.ht/publish/$site [email protected] -Fprotocol=GEMINI
For the index.gmi file, put whatever you want in there and save it.
You could even just copy and paste the Gemtext cheatsheet.
If you want to serve both HTML and Gemini files from this repository,
just add a second command to the upload section:
- upload: |
      acurl -f https://pages.sr.ht/publish/$site [email protected] -Fprotocol=GEMINI
      acurl -f https://pages.sr.ht/publish/$site [email protected]
Lastly, commit your changes and push them to the remote repo.
git add .; git commit -m "initial commit"; git push --set-upstream origin HEAD
If you've successfully created the files with the proper format, you'll see the terminal print a message that lets you know where the automatic build is taking place. For example, here's what the terminal tells me:
remote: Build started:
remote: https://builds.sr.ht/~user/job/689803 [.build.yml]
Now that you've properly built your Sourcehut page, you can browse to your-username.srht.site in a Gemini browser and view the final results. Take a look at the image below for my Sourcehut Gemini capsule.
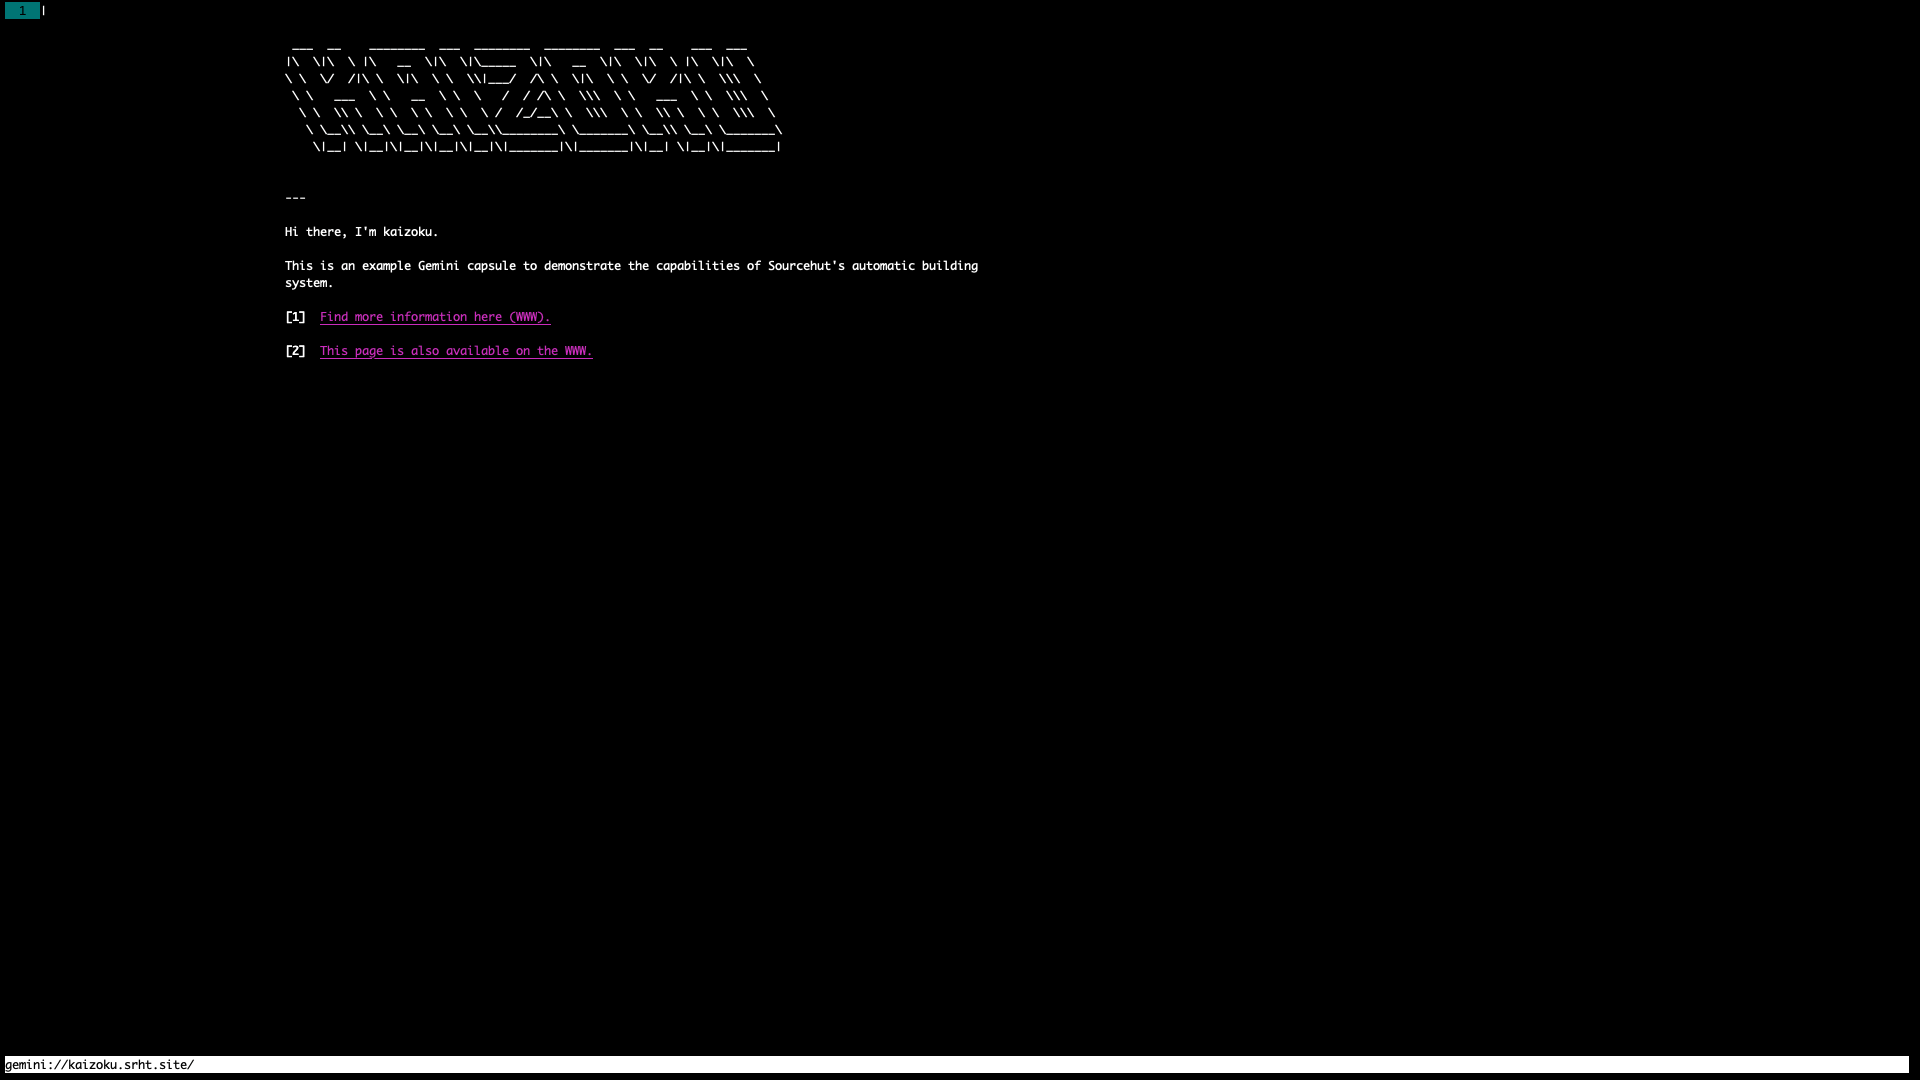
Figure 1: Gemini page on the amfora browser